1. Windows Server Backup cant use to back up file and folders on
volumes that require more than 2040 GB (or 2 TB). However, as long as
the data size is less than 2 TB, you can perform a file or folder
backup. For example, you can back up 1.5 TB of data from a 3-TB volume.
But, a full server or volume recovery using the backup will recreate a
2-TB volume instead of a 3-TB volume.
2. Only NTFS-formatted volumes on a locally attached disk can be backed up.
3. You cannot store backups on tape. (However, support of tape storage
drivers is still included in Windows Server 2008). Windows Server Backup
supports backing up to external and internal disks, optical and
removable media such as DVDs, and remote shared folders.
4. You cannot recover backups that you created with Ntbackup.exe by using
Windows Server Backup. However, a version of Ntbackup.exe is available
as a download to Windows Server 2008 for users who want to recover data
from backups created using Ntbackup.exe. The downloadable version of
Ntbackup.exe is only for recovering backups for older versions of
Windows and cannot be used to create new backups in Windows Server 2008
Saturday, December 20, 2014
Friday, December 12, 2014
FreeNAS 9.3 Released
This FreeNAS update is a significant evolutionary step from previous
FreeNAS releases, featuring a simplified and reorganized Web User
Interface, support for Microsoft ODX and Windows 2012 clustering, better
VMWare integration, including VAAI support, a new and more secure
update system with roll-back functionality, and hundreds of other
technology enhancements. We’re quite proud of it and excited to make it
publicly available.
You can get it here and the list of changes are here. We encourage all existing 9.2.x users and 9.3 beta testers to upgrade.
You can get it here and the list of changes are here. We encourage all existing 9.2.x users and 9.3 beta testers to upgrade.
Wednesday, December 3, 2014
Limitations for VMware Fault Tolerance
1. FT protected virtual machine should be running on the supported Guest operating system
2. FT protected virtual machine’s guest operating system and processor combination must be supported by Fault Tolerance.
3.Physical RDM is not supported for FT protected virtual machines but virtual mode RDM is supported
4.FT protected virtual machine should have eagerzeroed Thick disks. Virtual machine with thin provisioned disk will be automatically converted to thick disk, while enabling FT for the virtual machine. Make sure enough free space is avaialble in the datastore for this operation.
5.SMP (symmetric multiprocessing) is not supported. Only 1 VCPU per virtual mahcine is allowed.
6.Only 64 GB of maximum RAM is allowed for the FT VM’s.
7.Hot add and remove devices are not allowed for FT protected VM’s.
8.NPIV is not supported for FT VM’s.
9.USB Passthough and VMDirectPath should not be enabled for FT VM’s and it is not supported.
10. USB and Sound devices are not supported for FT VM’s.
11.Virtual Machine snapshot is not supported for FT protected VM’s.FT virtual Machines cannot be backed up using the backup technology like (VCB, vmware data recovery),which uses snapshot feature.
12. Virtual machine hardware version should be 7 and above
13.Paravirtualized Guest OS and paravirtualized scsi adapter for FT protected virtual machine is not supported.
14.Windows Guest OS should not be using MSCS (Microsoft Cluster services) to Protect the Virtual Machine using FT.
15.FT Protected virtual machines should not be HA disbaled by Virtual Machine level HA settings.
16. FT protected virtual machines cannot be migrated using svmotion. If want to migrate FT protected virtual machine, disable the FT on the VM, Migrate the VM using svmotion and re-enable the FT.
17. IPv6 is not supported by VMware HA so, it is not supported for FT.
Friday, November 21, 2014
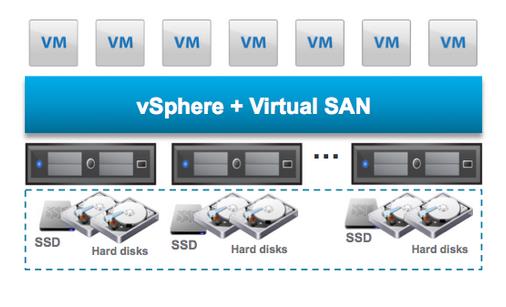
VSAN
With the release of VSAN, VMware fulfills the true software-defined
data center with the combination of virtualized compute, network and
storage. After VSAN release, I will definitely say that buying storage
for your infrastructure is not only limited to the storage vendors but
also VSAN will play a major role because which is part of hypervisor
after vSphere 5.5 Update 1 onwards. Virtual SAN 5.5 is a new
hypervisor-converged storage tier that extends the vSphere hypervisor to
pool server-side magnetic disks (HDDs) and solid-state drives (SSDs).
By clustering server-side HDDs and SSDs, Virtual SAN creates a
distributed shared datastore designed and optimized for virtual
environments.Virtual SAN is a standalone product that is sold separate
from vSphere and requires its own license key.


VSAN – Launch Promotions (Bundle Promos & Beta Promo)


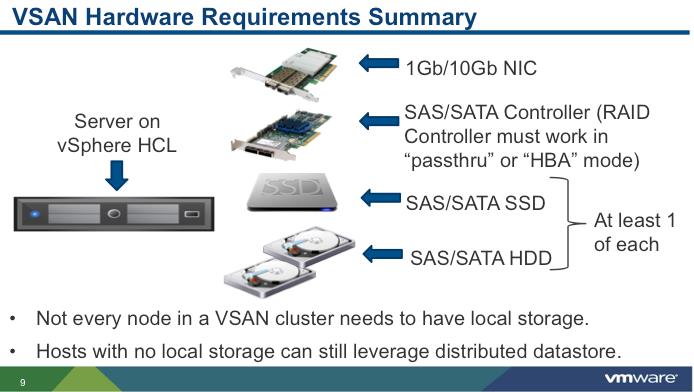
 Minimum Requirements for VSAN:
- Minimum of 3 ESXi 5.5 hosts with all contributing local disks (1 SSD and 1 HDD) to VSAN cluster
- Minimum 4 GB of RAM for ESXi host
- ESXi host should be managed by vCenter Server 5.5 and It should be configured as Virtual SAN cluster
- Each ESXi host must have minimum of single 1 Gb Ethernet adapter available solely for the use of virtual SAN
- At least 1 SAS or SATA solid state Drive (SSD) should be part of each ESXi host with SSD is not claimed by vSphere Flash Read Cache
VSAN Scalability:
VSAN with GA release, It supports around 32 Hosts, 3200 Virtual Machines, 2M Iops and 4.4 petabytes. It is really scalable and provides the scalability as like an enterprise storage.
How to Download VSAN:
As already explained, VSAN is included with he hypervisor form vSphere 5.5 Update 1. So download ESXi 5.5 Update 1 and vCenter server 5.5 Update 1 to use the VSAN. Log in or sign-up with your VMware account and download.Download VSAN
How to Build VSAN:
VMware provides the choice for the customers and partners to define a VSAN solution either building your own node via components on our VMware compatibility guide for VSAN or Selecting VSAN read node. A Virtual SAN Ready Node is a predefined combination of server hardware while a Ready Block is a predefined set of servers for use with VMware Virtual SAN. Configurations are based on server vendor validated configurations that include specific HDD, Flash and IO Controller components certified for Virtual SAN, and available on the VMware Compatibility Guide.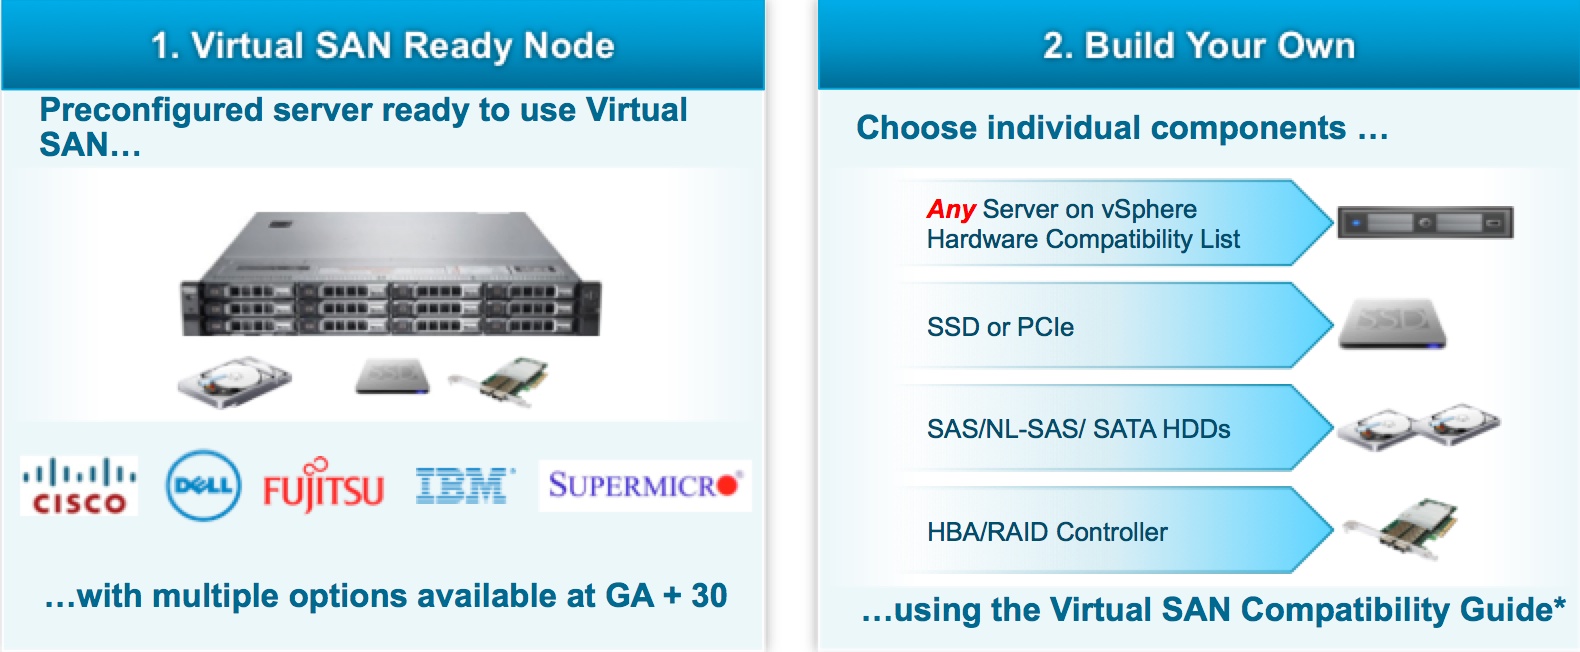
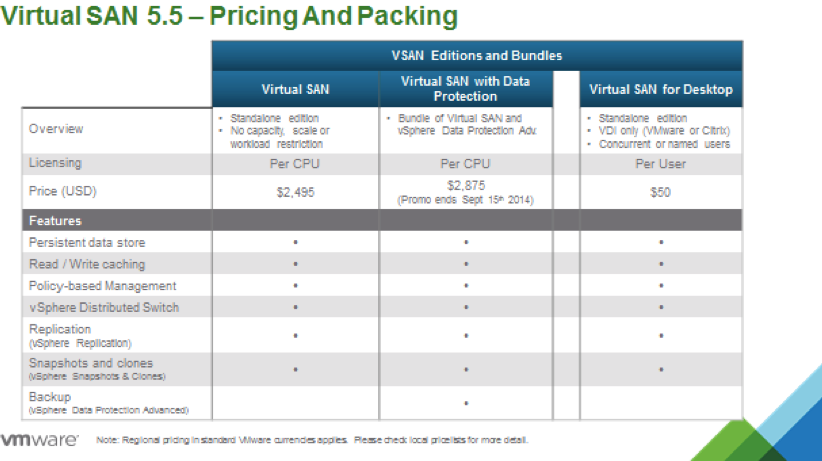
VSAN License and Prizing:
Below is the details about VSAN Prizing and Packaging. Below are the list of VSAN editions and bundles- VMware Virtual SAN Standalone
- VMware Virtual SAN for Desktops
- VMware Virtual SAN with Data Protection
- VSA Upgrade Bundle + vSAN with Data Protection (End Date: 9/15/2014)
- Beta Promo (End Date : 6/15/2014)
VSAN – Launch Promotions (Bundle Promos & Beta Promo)

How to Setup VSAN in your Environment:
We will explain step by step VSAN configuration in upcoming posts but I would like bring here the excellent demo walkthrough for VSAN from VMware. It gives the step by Step walkthrough for the each below mentioned configuration items.
Monday, November 10, 2014
Check ESXi Disk Failures from Command Line
It can be easliy checked using hardware managenet tools like HP system Management, HP ILO or even in Hardware status tab of ESXi host from vSphere Client. This post talks about the checking the status of disk failures for esxi host command line utilities. In this post, i am going to discuss about the HP hardware’s and how to check the disk failures from command line in Hp hardware’s. This post will guide you step by step procedure to verify the disk status in ESXi host using HPSSACLI utility which is part of HP ESXi Utilities Offline bundle for VMware ESXi 5.x.
HP ESXi Utilities Offline bundle for VMware ESXi 5.x will be available as part of HP customized ESXi installer image but if it is not a HP customized ESXi image then you may need to download and install HP ESXi Utilities Offline bundle for VMware ESXi 5.x.This ZIP file contains 3 different utilities HPONCFG , HPBOOTCFG and HPSSACLI utilities for remote online configuration of servers.
- HPONCFG — Command line utility used for obtaining and setting ProLiant iLO configurations.
- HPBOOTCFG — Command line utility used for configuring ProLiant server boot order.
- HPSSACLI – Command line utility used for configuration and diagnostics of ProLiant server SmartArrays.
esxcli software vib install -f -v /tmp/hp-esxi5.5uX-bundle-1.7-13.zip
You can even directly donwload HPSSACLI utility and Upload the VIB file into your ESXi host and execute the below command to install the HPACUCLI utility.
esxcli software vib install -f -v /tmp/hpssacli-1.60.17.0-5.5.0.vib
Once it is installed. Browse towards the directory /opt/hp/hpssacli/bin and verify the installation.
Check the Disk Failure Status:
Type the below command to check the status of Disks in your ESXi host. It displays the status of the Disk in All Arrays under the Controller./opt/hp/hpssacli/bin/hpssacli controller slot=0 physicaldrive all show
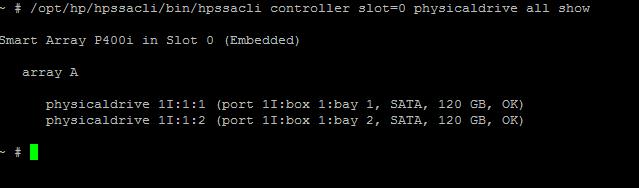
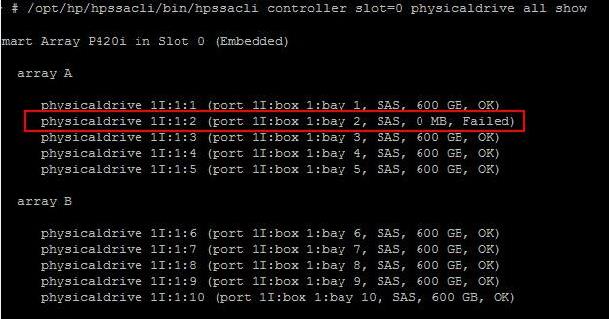
Thats it. We identified the disk failure, You may need to generate the HP ADU (Array Diagnostics Utility) report to raise the support case with hardware vendor.
Monday, November 3, 2014
CoreOS

CoreOS uses Docker to deploy applications in virtual containers; it also features a management communications bus, and group instance management.
Rackspace, Amazon Web Services (AWS), GoogleComputeEngine (GCE), and Brightbox are early cloud compute providers compatible with CoreOS and with specific deployment capacity for CoreOS. We tried Rackspace and AWS, and also some local “fleet” deployments.
CoreOS is skinny. We questioned its claims of less overall memory used, and wondered if it was stripped to the point of uselessness. We found that, yes, it saves a critical amount of memory (for some), and no, it’s tremendously Spartan, but pretty useful in certain situations.
CoreOS has many similarities with Ubuntu. They’re both free and GPLv3 licensed. Ubuntu 14.04 and CoreOS share the same kernel. Both are easily customizable, and no doubt you can make your own version. But CoreOS shuns about half of the processes that Ubuntu attaches by default.
If you’re a critic of the bloatware inside many operating systems instances, CoreOS might be for you. In testing, we found it highly efficient. It’s all Linux kernel-all-the-time, and if your organization is OS-savvy, you might like what you see in terms of performance and scale.
Security could be an issue
CoreOS uses curl for communications and SSL, and we recommend adding a standard, best-practices external SSL certificate authority for instance orchestration. Otherwise, you'll be madly generating and managing SSL relationships among a dynamic number of instances. CoreOS sends updates using signed certificates, too.With this added SSL security control, your ability to scale efficiently is but a few scripts away. Here’s the place where your investment in SSL certs and chains of authority back to a root cert is a good idea. It adds to the overhead, of course, to use SSL for what might otherwise be considered “trivial” instances. All the bits needed for rapid secure communications with SSL are there, and documented, and wagged in your face. Do it.
What You Get
CoreOS is a stripped-down Linux distro designed for rapidly deployed Spartan instance use. The concept is to have a distro that’s bereft of the usual system memory and daemon leeches endemic to popular distributions and “ecosystems.’’ This is especially true as popular distros get older and more “feature packed”.More available memory usually means more apps that can be run, and CoreOS is built to run them in containers. Along with its own communications bus—primitive as it is— you get to run as many instances (and apps) as possible with the least amount of overhead and management drama.
For those leaning towards containerized instances, it blasts them in a controlled procedure, then monitors them for health. It’s not tough to manage the life cycle of a CoreOS instance. RESTful commands do much of the heavy lifting.
Inside CoreOS is a Linux kernel, LXC capacity, and the etcd/etcd daemon service discovery/control daemon, along with Docker, the application containerization system, and systemd—the start/stop process controller that’s replaced various initd (initial daemon) in many distros.
There is multiple instance management using fleet—a key benefit for those primarily starting pools and even oceans of instances of apps/OS instances on a regular basis.
Like Ubuntu and RedHat, it uses the systemd daemon as an interface control mechanism, and it’s up to date with the same kernel used by Ubuntu 14.04 and RedHat EL7. Many of your updated systemd-based scripts will work without changes.
The fleetd is controlled by the user space command fleetctl and it instantiates processes, and the etcd daemon is a service discovery (like a communications bus) using etcdctl for monitoring—all at a low level and CLI-style.
The etcd is used to accept REST commands, using simple verbs. It uses a RESTful API set, and it’s not Puppet, Chef, or other service bus communications bus controller, but a lean/tight communications methodology. It works and is understandable by Unix/Linux coders and admins.
A downside is that container and instance sprawl become amazingly easy. You can fire instances, huge number of them, at will. There aren’t any clever system-wide monitoring mechanisms that will warn you that your accounting department will simply explode when they see your sprawl bill on AWS or GCE. Teardown isn’t enforced—but it’s not tough to do.
We did a test to determine the memory differences between Ubuntu 14.04 and CoreOS, configuring each OS as 1GB memory machines on the same platform. They reported the same kernel (Linux 3.12), and were used with default settings.
We found roughly 28% to 44% more memory available for apps with CoreOS — before "swap" started churning the CPU/memory balances within the state machine.
This means an uptake in speed of execution for apps until they need I/O or other services, less memory churn and perhaps greater cache hits. Actual state machine performance improvements are dependent on how the app uses the host but we feel that the efficiencies of memory use and overall reduction in bloat (and security attack surface potential) are worth the drill.
These results were typical across AWS, GCE, and our own hosted platform that ran on a 60-core HP DL-580 Gen8. The HP server used could probably handle several hundred instances if we expanded the server’s memory to its 6TB max—not counting Docker instances.
We could easily bring up a fleet of CoreOS instances, control it, feed it containers with unique IDs and IPs, make the containers do work (we did not exercise the containers), then shut them down, mostly with shell scripts rather than direct commands.
The suggested scripts serve as a template, and more templates are appearing, that allowed us to easily replicate functionality, so as to manage sprawl. If you’re looking for instrumentation, get some glitzy UI elsewhere, and the same goes for high-vocabulary communications infrastructure.
Once you start adding daemons and widgetry, you’re back to Ubuntu or RedHat.
And we warn that we could also make mistakes that were unrecoverable with equally high speed, and remind that there aren’t any real safeguards except syntax checking, and the broad use of SSL keys.
You can make hundreds of OS instances, each with perhaps 100 Docker container apps all moving hopefully in a harmonious way. Crypt is used, which means you need your keys ready to submit to become su/root. Otherwise, you’re on your own.
Summary
This is a skinny instance, bereft of frills and daemons-with-no-use. We found more memory and less potential for speed-slowing memory churn. Fewer widgets and daemonry also means a smaller attack surface. No bloat gives our engineer’s instinctual desire to match resources with needs—no more and no less—more glee.CoreOS largely means self-support, your own instrumentation, plentiful script building, and liberation from the pomposity and fatuousness of highly featured, general purpose, compute-engines.
Saturday, October 18, 2014
All Versions of VMware vSphere Client download link
| vSphere Client Version | Installer File Name | Download Link (Click on the Image to Download) |
| VMware vSphere Client v4.1 Update 1 | VMware-viclient-all-4.1.0-345043.exe |  |
| VMware vSphere Client v4.1 Update 2 | VMware-viclient-all-4.1.0-491557.exe |  |
| VMware vSphere Client v4.1 Update 3 | VMware-viclient-all-4.1.0-799345.exe | |
| VMware vSphere Client v5.0 | VMware-viclient-all-5.0.0-455964.exe | |
| VMware vSphere Client v5.0 Update 1 | VMware-viclient-all-5.0.0-623373.exe | |
| VMware vSphere Client v5.0 Update 2 | VMware-viclient-all-5.0.0-913577.exe | |
| VMware vSphere Client v5.0 Update 3 | VMware-viclient-all-5.0.0-1300600.exe | |
| VMware vSphere Client v5.1 | VMware-viclient-all-5.1.0-786111.exe | |
| VMware vSphere Client 5.1.0a | VMware-viclient-all-5.1.0-860230.exe | |
| VMware vSphere Client 5.1.0b | VMware-viclient-all-5.1.0-941893.exe | |
| VMware vSphere Client 5.1 Update 1 | VMware-viclient-all-5.1.0-1064113.exe | |
| VMware vSphere Client 5.1 Update 1b | VMware-viclient-all-5.1.0-1235233.exe | |
| VMware vSphere Client 5.1 Update 2 | VMware-viclient-all-5.1.0-11471691.exe | |
| VMware vSphere Client 5.5 | VMware-viclient-all-5.5.0-1281650.exe | |
| VMware vSphere Client 5.5 Update 1 | VMware-viclient-all-5.5.0-1618071.exe | |
| VMware vSphere Client 5.5 Update 2 | VMware-viclient-all-5.5.0-1993072.exe | |
Thursday, October 2, 2014
Manually Update Bash to Patch Shellshock Bug on RHEL Based Linux Systems
Step 1: Back up your existing Bash binary
Find out where your existing bash binary is located on your system with:|
1
|
which bash
|
|
1
|
/bin/bash
|
|
1
|
sudo cp /bin/bash /bin/bash.old
|
Step 2: Determine which version of Bash you’re running
Now you’ll need to determining which version of bash your system is running. If you’re running Fedora 12, for example, it’s probably version 4.0. You can find out your version with:|
1
|
bash --version
|
|
1
|
GNU bash, version 4.0.1(1)-release (i686-redhat-linux-gnu)
|
|
1
|
GNU bash, version 4.0.42(1)-release (i686-pc-linux-gnu)
|
Step 3: Set up your fix environment
Whenever I’m working with source code on a Linux box, I like to keep everything in the /usr/local/src directory. So create a new subdirectory for fixing bash, and then jump into that directory, with:|
1
2
|
mkdir /usr/local/src/bashfix
cd /usr/local/src/bashfix
|
|
1
|
sudo yum install patch byacc textinfo bison autoconf gettext ncurses-devel
|
Step 4: Download the Bash source
Locate the matching source code for the version of Bash you’re already running on the GNU.org FTP server. Since my test system was using 4.0, that’s what I’ll download in this example, but you should obviously download the one that’s appropriate for your system. Again, resist the urge to upgrade to a newer version (such as 4.1, 4.2, or 4.3 in this example). This can potentially create serious problems. Just stick with what you’ve already got for now. Download and extract the appropriate Bash source code into your fix directory with:|
1
2
|
wget https://ftp.gnu.org/pub/gnu/bash/bash-4.0.tar.gz
tar zxvf bash-4.0.tar.gz
|
|
1
|
cd bash-4.0
|
Step 5: Download and Apply the Patches
If you check the GNU.org FTP server where you downloaded the source code, you’ll also see a few sub-directories for each major version that contain all the patches for that version. Different versions of Bash have a different number of patches. In our example, the patches are located in https://ftp.gnu.org/pub/gnu/bash/bash-4.0-patches/. Checking that directory (as of Oct 1, 2014) shows a total of 42 patches for version 4.0, from bash40-001 to bash40-042. Your first option is to download the first patch, apply it to the source code, then download the second patch, apply it to the source code, and so on. Don’t do this just yet, because I’m going to show you a faster way to do it. But you should at least understand what’s happening before you automate it. The command you’d use to download the first patch and apply it in a single step would be (again, don’t do this… it’s just for illustration):|
1
|
curl https://ftp.gnu.org/pub/gnu/bash/bash-4.0-patches/bash40-001 | patch -p0
|
|
1
|
wget https://gist.githubusercontent.com/stevejenkins/3d64d3543060c1bcac92/raw/1ab592f5c8b584e9a0debf8e2ccbcac50cbf6e73/bash-multipatch.sh
|
I do my best to stay on top of this issue, but It’s possible that even more patches are available in the patches directory before I’ve had a chance to update this article. You should always set the lastpatch variable in the script to the last patch you see in the directory to ensure the highest level of vulnerability protection. Save your edited file, then make it executable with:
|
1
|
chmod 755 bash-multipatch.sh
|
|
1
|
./bash-multipatch.sh
|
|
1
2
3
4
5
6
|
https://ftp.gnu.org/pub/gnu/bash/bash-4.0-patches/bash40-042
% Total % Received % Xferd Average Speed Time Time Time Current
Dload Upload Total Spent Left Speed
101 4056 101 4056 0 0 10947 0 --:--:-- --:--:-- --:--:-- 54810
patching file parse.y
patching file patchlevel.h
|
|
1
|
cat patchlevel.h
|
Step 6: Build and Install your Patched Bash Binary
It’s best if the “configure” and “make” steps in this section are performed as a regular, non-root user. However, on particularly older systems, if you’re getting errors other than missing dependencies when running “configure,” you may just have to do them as root.In the source code directory, do:
|
1
|
./configure
|
|
1
|
make
|
|
1
|
make test
|
|
1
|
ls -la bash
|
|
1
|
-rwxrwxr-x 1 root root 2273014 2014-09-28 08:37 bash
|
|
1
|
sudo cp -f bash /bin/bash
|
Step 7: Test Your Fix
Now that you’ve manually downloaded, patched, compiled, and installed a new bash, you should test it to make sure you’re no longer vulnerable. Make sure your current shell session is using your newly compiled bash by simply running the new location from the command line. In this example, that would be:|
1
|
/bin/bash
|
|
1
|
bash --version
|
|
1
|
GNU bash, version 4.0.42(1)-release (i686-pc-linux-gnu)
|
Sunday, September 28, 2014
Shellshock Bash Vulnerability - How to check
How to Check System Vulnerability on Bash
On each of your systems that run Bash, you may check for Shellshock vulnerability by running the following command at thebash prompt:env VAR='() { :;}; echo Bash is vulnerable!' bash -c "echo Bash Test" echo Bash is vulnerable! portion of the
command represents where a remote attacker could inject malicious code;
arbitrary code following a function definition within an environment
variable assignment. Therefore, if you see the following output, your
version of Bash is vulnerable and should be updated:
Bash is vulnerable!
Bash Test
Otherwise, if your output does not include the simulated attacker's payload, i.e. "Bash is vulnerable" is not printed as output, your version of bash is not vulnerable. It may look something like this:
bash: warning: VAR: ignoring function definition attempt
bash: error importing function definition for `VAR'
Bash Test
Wednesday, September 17, 2014
Vmware New migration Tools : XenApp2Horizon
The XenApp2Horizon Fling helps you migrate published applications and
desktops from XenApp to Horizon View. One XenApp farm is migrated to
one or more Horizon View farm(s).
The GUI wizard-based tool helps you:

The GUI wizard-based tool helps you:
- Validate the View agent status on RDS hosts (from View connection server, and XenApp server)
- Create farms
- Validate application availability on RDS hosts
- Migrate application/desktop to one or multiple farms (new or existing)
- Migrate entitlements to new or existing applications/desktops. Combination of application entitlements are supported
- Check environment
- Identify incompatible features and configuration

Saturday, September 13, 2014
Systemd: RHEL 7 / Centos 7
In RHEL 7 / Centos 7 new release, there are now systemd commands you can start using to start, restart and
stop various services. They still have the ‘service’ command included
for backwards compatibility.
Here are some examples:
Stop service:
Start service:
Restart service (stops/starts):
Reload service (reloads config file):
List status of service:
What about chkconfig? That changed too? Yes, now you want to use systemctl for the chkconfig commands also..
chkconfig service on:
chkconfig service off:
chkconfig service (is it set up to start?)
chkconfig –list (shows what is and isn’t enabled)
Here are some examples:
Stop service:
|
1
|
systemctl stop httpd
|
|
1
|
systemctl start httpd
|
|
1
|
systemctl restart httpd
|
|
1
|
systemctl reload httpd
|
|
1
|
systemctl status httpd
|
chkconfig service on:
|
1
|
systemctl enable httpd
|
|
1
|
systemctl disable httpd
|
|
1
|
systemctl is-enabled httpd
|
|
1
|
systemctl list-unit-files --type=service
|
Subscribe to:
Comments (Atom)